Many articles provide instructions on how to build a DIY LED grow light at a low cost. However, they often fail to mention important tips and tricks that can significantly improve the efficiency and usability of your DIY project.
In this article, we will share some valuable tricks to assist you in constructing a more efficient and practical DIY LED grow light. Make sure you have learned the steps to build an LED grow light yourself.
Please note that we do not provide instructions for the entire DIY process here. Instead, this blog is an addition of details and tricks for those who have already read or experienced the complete DIY process.
Diode Layout Design
Diode layout design plays a crucial role in the effectiveness of a DIY LED grow light. To achieve optimal light distribution and coverage, careful consideration must be given to the arrangement and positioning of the diodes.
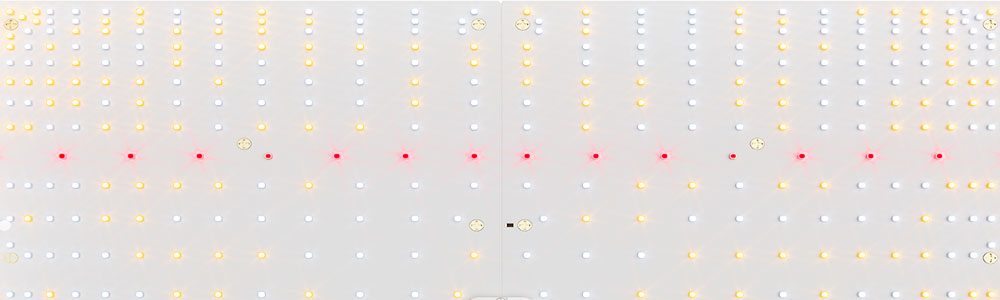
LEDs Layout Pattern
A uniform diode layout does not necessarily result in uniform light distribution.
When making their own LED grow lights, DIYers tend to arrange the diodes in an array with strictly the same spacing between each diode line and strictly the same spacing between each diode. They do this because this is the easiest way to achieve the basic Overlapping Light Patterns, which refers to the intentional arrangement of diodes in an LED grow light in a way that allows their emitted light to overlap with one another to aim for eliminating any potential dark spots or areas of insufficient light intensity.
However, the spacing between the diodes, if designed to be strictly the same, will result in too much light overlapped in the center and weak light at the edges, resulting in hotspot issues and uneven plant growth and yield.
While a strictly uniform diode layout may lead to uneven light distribution, simply spacing the diodes in a random or haphazard manner is not ideal either.
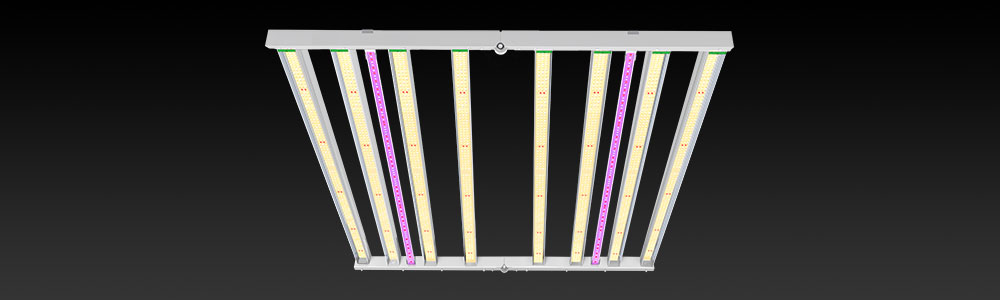
The right approach to diode layout design in DIY LED grow lights involves using a staggered or offset diode arrangement. In other words, arrange fewer light diodes in the middle and more at the edge. In practice, that is: the distance between the diode lines is far in the middle and close at the edge; the diodes on each line are sparse in the middle and compact at the edge.
By employing a staggered or offset diode layout, you can achieve a more balanced and uniform light distribution, minimizing hotspot issues and ensuring consistent coverage across the entire growing area.
Spectrum Design
Design the spectrum according to your cultivation needs (for seedlings, for asexual propagation, for flowering). However, if you are aiming for a full growth cycle, use a mix of diodes with a lower color temperature (3000K - 5000K) and make sure to invest in a few 660 nm diodes.
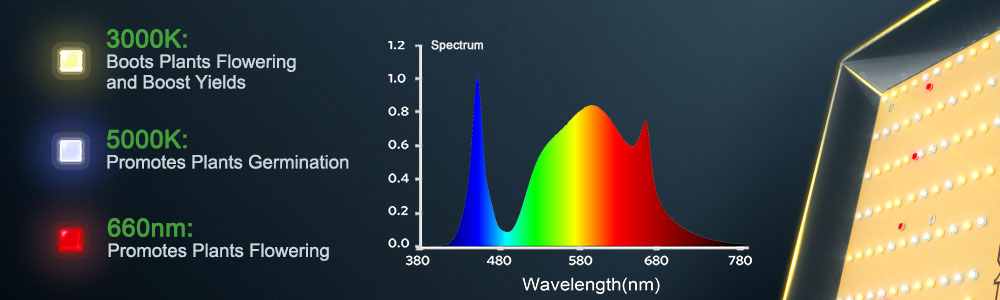
The lower color temperature diodes in the range of 3000K to 5000K emit a warm white to cool white light that is suitable for vegetative growth. This range provides a balanced spectrum with a good amount of blue light, which promotes healthy leaf and stem development, as well as overall plant growth. On the other hand, the inclusion of 660 nm diodes is recommended for flowering and fruiting stages. These red diodes are known to stimulate the flowering response in plants. They play a crucial role in the development of flowers, fruits, and reproductive processes. Incorporating 660 nm diodes ensures that plants receive the specific wavelengths of light they need to transition into the flowering stage and maximize their yield potential.
Avoid adding UV rays to your spectrum. UV light is not effective for every stage of plant growth. If your goal is to increase biomass in the flowering stage, a few UV diodes won't help with that. In addition, UV diodes usually have a high decay rate, which means they break down easily.
Thermal Management
Proper thermal management is crucial for maintaining the performance, longevity, and reliability of the LED grow light.Passive heat sinks and active built-in fans are the primary methods of cooling LED grow lights. And DIYers may already know the importance of aluminum as a good cooling material for building an LED grow light. But what else should we be aware of?
Built-in Fan
In LED grow light thermal management, incorporating a built-in fan may seem like a convenient solution. However, it is important to be mindful of the potential drawbacks associated with fan usage.
Firstly, fan components can contribute to wiring issues and energy loss, reducing the overall efficiency of the grow light. Additionally, fans are susceptible to damage and may require frequent maintenance or replacement, adding complexity to the DIY project. Moreover, cleaning and maintaining the light becomes more challenging with the presence of internal fan components.
Therefore, it is generally not recommended for DIYers to install a fan cooling element inside the light. If heat dissipation via a fan is necessary, it is advisable to consider purchasing a separate clip fan that can be positioned outside the light.
Heat Sink & Light Bar Spacing
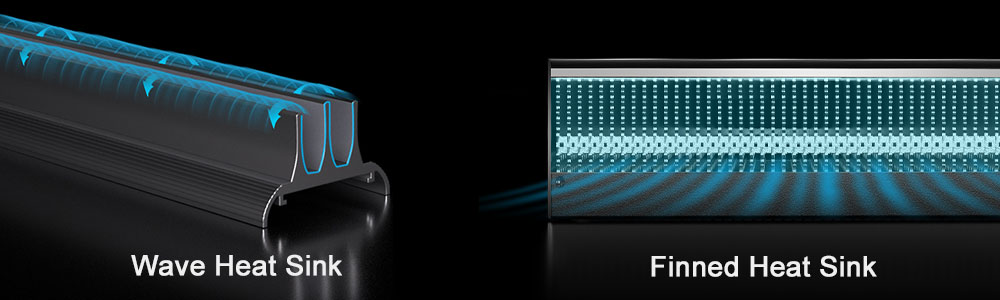
When it comes to keeping your DIY LED grow light cool, passive thermal management is the name of the game. The trick is all about conducting heat and increasing the contact area with the air to get that heat moving.
Aluminum heat sinks are your best buddies for conducting heat. The rule of thumb is, the higher the wattage you're planning for your LED lights, the thicker your heat sink should be. And if you go for a finned heat sink, you're in for a treat! Those fins increase the surface area exposed to the air, which means better cooling while keeping the weight down.
Now, if you're going all out with a multi-bar LED grow light in your DIY project, you might think you're good to go with the natural spacing between the light bars. There's usually enough room for air to circulate and cool things down. But here's a pro tip: consider adding small heat sinks (like wave-shaped heat sinks) to each light bar. This helps eliminate excess heat from the diodes' junctions, keeping things nice and cool for better performance and longevity.
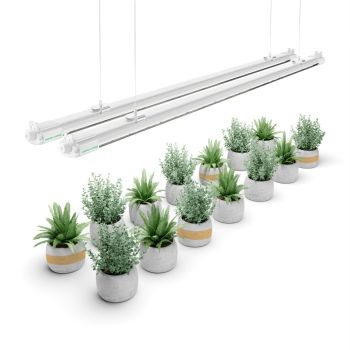
Build A Light Kit Instead Of A Single Light
When DIY led grow lights, don't just make one, try making a light kit with at least two lights, one major light for the full growth cycle and the other small one for targeted growth.
For example, during the vegetative stage, your plants might benefit from the light with a higher blue spectrum to promote healthy foliage growth. On the other hand, during the flowering stage, a light with a higher red spectrum can help stimulate robust flower production. Besides, consider incorporating UV and IR wavelengths into your tailored lighting setup rather than a full cycle lighting setup to accurately increase the products you want from your plants.
Another reason to build a light kit is the light direction. LED lights tend to emit light in a focused direction with minimal dispersion. To ensure that your plants receive adequate light coverage from all angles, it's a smart move to add a second light and position it in a different direction (or placed it from the bottom to the top). By doing so, you can achieve better light distribution throughout the canopy and avoid shadowed or shaded areas. This strategic placement of lights helps to ensure that every part of your plants receives sufficient light for optimal growth and development.
To Round Up
In conclusion, when embarking on a DIY LED grow light project, there are several key considerations to keep in mind. Diode layout design should aim for a balanced and uniform light distribution, achieved through a staggered or offset arrangement to minimize hotspot issues. A mix of lower color temperature diodes (3000K - 5000K) in spectrum design for vegetative growth and 660 nm diodes for flowering stages. Effective thermal management with passive methods such as aluminum heat sinks and strategic light bar spacing to promote heat dissipation. Building a light kit with multiple lights allows for targeted growth and ensures comprehensive light coverage from different directions.
By incorporating these tips and tricks, you can enhance the efficiency and effectiveness of your DIY LED grow light project, resulting in healthier plants and improved yields. Happy DIYing and happy growing!